
0rganic 26
Key Skills
Developing music production and arrangement skills within Live
Use of EQ- compression, effects processing for shape and balance
Sound design using Ableton stock and third party plugins
Understanding of gain staging and headroom management
CPU management
Building layered arrangements to create depth and texture to keep the listener interested
Experimenting with different textures and sounds and harmonic awareness learning how to experiment with complimentary notes within the scale.Diatonic harmonic relationships, applying chords within a shared key centre like c-major and d minor to create coherent progressions, Music Theory(still learning)
So, this tune is my first effort at putting something together for someone to hear. We have to start somewhere, with something. Using Ableton, I produced my first original track. The aim of this project was to develop my production skills by taking an eight-bar loop through to a fully arranged track.
I focused on building a clear structure, a rhythmic foundation, and applying mixing techniques to achieve professional sounding track.
I began by developing the core idea of the track with the kick drum and bass. Just to get a groove going. I have used drum racks that have a full sounding set in them along with separate percussion racks on separate tracks Add a few shakers with hi hat and clap. Layering is important in progressive house because it must constantly move otherwise the listener will get bored quickly, so you are constantly doing something to keep the listener engrossed.
Sound selection with layering is the key to these tunes so I pick my sounds in key and altered samples completely to get some awesome sounds. Frequency range must complement each other for sure it is about getting lost in the music. Call and response is key.
During the mix stage I used EQ, compression sidechaining and saturation to balance the elements in the track.
Production Overview
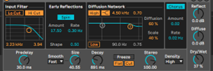
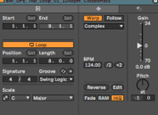
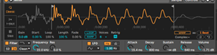
I produced this track in Ableton Live in a progressive house style. The focus of the project was keeping the session well organised, maintaining mix clarity and ensuring I had full control over each element of the production and mixing. The track is built around layered drums,-base and sub ,synths ,vocals and effects, all of which are structured in a way that allows for efficient workflow and consistent sound shaping throughout the mix. To keep the project manageable, I grouped tracks for easier control of the production. Drums, bass ,synths , vocals and effects. Each of these groups is rooted into its own dedicated bus channel. This approach allowed me to process entire sections rather than relying on individual tracks which helps maintain consistency and speeds up the mixing process. On each bus, I used a combination of effects to shape and control the sound before it reaches the master stage. Typical processing I used included EQ8,which I use for cleaning up unwanted frequencies, carving space between elements, for example removing low end rumble or harsh highs from the drums. Glue compressor used to lightly compress group elements and glue them together for a more cohesive sound. Saturator adds subtle harmonic distortion and warmth, helping elements feel fuller and more present in the mix. Utility I used for gain staging and stereo control, particularly for keeping low end elements like base and sub mono. This post processing helps each section sound balanced before being gelled together in the full mix. The low end is split into two layers for better control of them and clarity as well . The sub focuses purely on low frequency content and is kept clean and mono with unwanted higher frequencies removed using EQ8. The bass group provides mid range harmonics definition, so the bass can still be heard clearly on smaller playback systems. Sidechain compression is applied using Ableton's compressor and kickstart 2 which I routed to my dedicated sidechain track . I did this so the kick drum has space in the mix and the low end remains tight and controlled. FX send and return system works like, Instead of using insert effects on every track, I used return channels for time based and atmospheric processing. This helps maintain consistency across the mix and reduces CPU usage. On my effects return bus I use third party plug -ins on a couple of tracks just for different reverb effects, these effects were used to create more atmospheric and moving emotional vibe with processing which suits progressive house music. Reverbs were used to create weight and mainly on the synths adding depth and atmosphere. . Delay was used more creatively on the wee stabs to produce evolving echoes and smooth transitional effects between sections. The FX routing allows multiple elements to share the same environment helping the track feel more cohesive and sitting together in the mix. ,I also used echo on a few sounds for rhythmic delay effects and stereo movement, particularly on the synths and the vox elements. All group buses are routed into a pre master channel before the final master output. This stage is used for overall mix balancing and gentle processing. On the pre master I used. EQ8 for subtle tonal balancing, glue compressor, saturator for warmth and cohesion. The purpose of this stage is to ensure the track has enough headroom. And that no frequency ranges are over doing it before the final export .The main goal of the setup was to create a structured workflow that allowed me to do detailed sound design while keeping the mix organised and easy to control. . Bus processing plus send and return effects and lots of automation made it easier to manage my progressive house tune`s arrangement when many layered elements are playing at once. The use of both Ableton stock devices. Add third party plug-ins. . Make for some interesting sound design I am only at the very beginning stages of doing this but so far so good .


Links and Resources
Audio for Multimedia with Keir and Chris
Niko Ava -https://www.youtube.com/live/hAul6Jb6g1c?si=Qjwi-7Z-iE66znWJ
Matt Tinkler -https://youtu.be/j1NxVWos0Zw?si=YmLz154iVLzaZKDZ